The IDE is configurable in a wide range: Colors can be changed, screen resolution. The
configuration setting can reached via the sub-menu Environment in the Options menu.
The preferences dialog is called by the menu item ”Options--Environment--Preferences”.
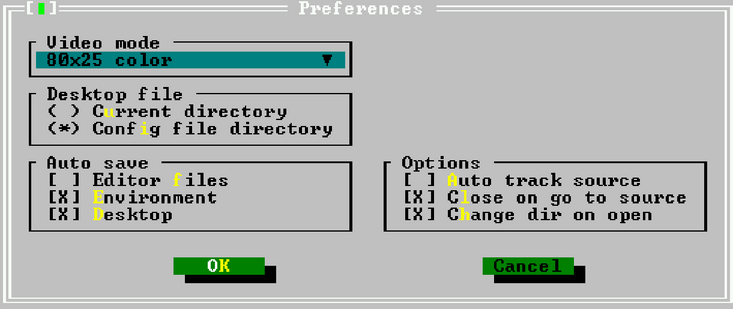
The preferences dialog is shown in figure (6.32).
-
Video modes
- The drop down list at the top of the dialog allows to select a video mode. The
available video modes depend on the system on which the IDE is running.
Remark:
- The video mode must be selected by pressing space or clicking on it. If the drop
down list is opened while leaving the dialog, the new video mode will not be
applied.
- For the DOS version of the IDE, the following should be noted: When using VESA
modes, the display refresh rate may be very low. On older graphics card (1998 and
before), it is possible to use the UniVBE driver of SciTech5
-
Desktop File
- Specifies where the desktop file is saved: the current directory, or the directory
where the config file was found;
-
Auto save
- Here it is possible to set which files are saved when a program is run or when the IDE
is exited:
-
Editor files
- The contents of all open edit windows will be saved.
-
Environment
- The current environment settings will be saved
-
Desktop
- The desktop file with all desktop settings (open windows, history lists,
breakpoints etc.) will be saved.
-
Options
- Some special behaviour of the IDE can be specified here:
-
Auto track source
-
-
Close on go to source
- When checked, the messages window is closed when the ’go
to source line’ action is executed.
-
Change dir on open
- When a file is opened, the directory of that file is made the
current working directory.
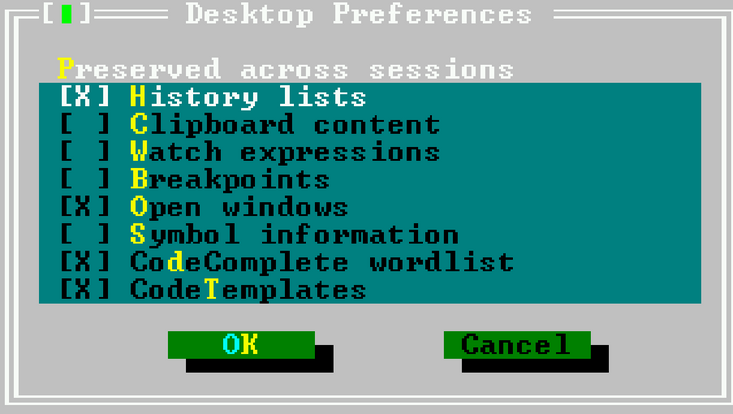
The desktop preferences dialog allows to specify what elements of the desktop are
saved across sessions, i.e. they are saved when the IDE is left, and they are again restored when the
IDE is started the next time. They are saved in a file fp.dsk. The desktop preferences dialog is
shown in figure (6.33).
The following elements can be saved and restored across IDE sessions:
-
History lists
- Most entry boxes have a history list where previous entries are saved and can
be selected. When this option is saved, these entries are saved in the desktop file. On
by default.
-
Clipboard content
- When checked, the contents of the clipboard is also saved to disk. Off
by default.
-
Watch expressions
- When checked, all watch expressions are saved in the desktop file. Off
by default.
-
Breakpoints
- When checked, all break points with their properties are saved in the desktop
file. Off by default.
-
Open windows
- When checked, the list of files in open editor windows is saved in the
desktop file, and the windows will be restored the next time the IDE is run. On by
default.
-
Symbol information
- When checked, the information for the symbol browser is saved in
the desktop file. Off by default.
-
CodeComplete wordlist
- When checked, the list of code-completion words is saved. On
by default.
-
CodeTemplates
- When checked, the defined code-templates are saved. On by default.
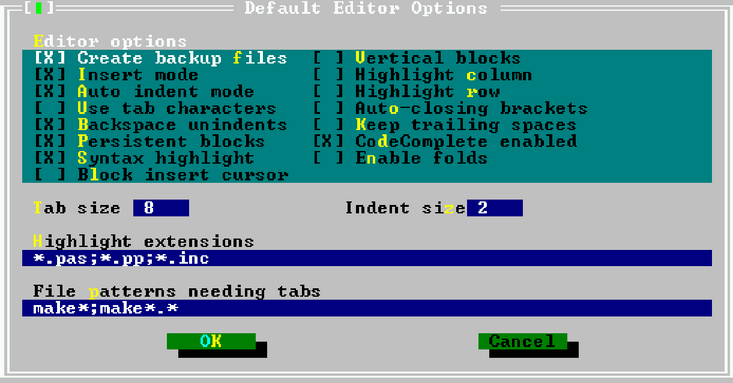
Several aspects of the editor window behaviour can be set in this dialog. The editor
preferences dialog is shown in figure (6.34).
The following elements can be set in the editor preferences dialog:
-
Create backup files
- Whenever an editor file is saved, a backup is made of the old file. On
by default.
-
Auto indent mode
- Smart indenting is on. This means that pressing ENTER will position
the cursor on the next line in the same column where text starts on the current line.
On by default.
-
Use tab characters
- When the tab key is pressed, use a tab character. Normally, when the
tab key is pressed, spaces are inserted. When this option is checked, tab characters will
be inserted instead. Off by default.
-
Backspace unindents
- Pressing the BKSP key will unindent if the beginning of the text
on the current line is reached, instead of deleting just the previous character. On by
default.
-
Persistent blocks
- When a selection is made, and the cursor is moved, the selection is not
destroyed, i.e. the selected block stays selected. On by default.
-
Syntax highlight
- Use syntax highlighting on the files that have an extension which appears
in the list of highlight extensions. On by default.
-
Block insert cursor
- The insert cursor is a block instead of an underscore character. By
default the overwrite cursor is a block. This option reverses that behaviour. Off by
default.
-
Vertical blocks
- When selecting blocks over several lines, the block doesn’t select the whole
lines in the block, it selects the lines till the column on which the cursor is located. Off
by default.
-
Highlight column
- When checked, the current column (i.e. the column where the cursor
is) is highlighted. Off by default.
-
Highlight row
- When checked, the current row (i.e. the row where the cursor is) is
highlighted. Off by default.
-
Auto closing brackets
- When an opening bracket character is typed, the closing bracket
is also inserted at once. Off by default.
-
Keep trailing spaces
- When saving a file, the spaces at the end of lines are stripped off.
This behaviour disables that behaviour, i.e. any trailing spaces are also saved to file.
Off by default.
-
Codecomplete enabled
- Enable code completion. On by default.
-
enable folds
- ???. Off by default.
-
Tab size
- The number of spaces that are inserted when the TAB key is pressed. The default
value is 8.
-
Indent size
- The number of spaces a block is indented when calling the block indent
function. The default value is 2.
-
Highlight extensions
- When syntax highlighting is on, the list of file masks entered here
will be used to determine which files are highlighted. File masks should be separated
with semicolon (;) characters. The default is *.pas;*.pp;*.inc.
-
File patterns needing tabs
- Some files (such as makefiles) need actual tab characters
instead of spaces. Here a series of file masks can be entered for which tab characters
will always be used. Default is make*;make*.*.
Remark: These options will not be applied to already opened windows, only newly opened windows will
have these options.
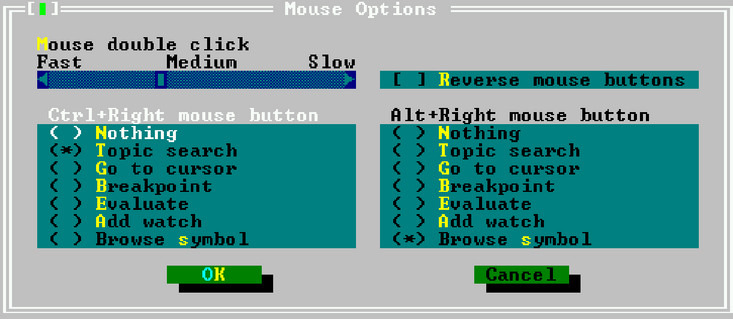
The mouse options dialog is called by the menu item ”Options--Environment--Mouse”. It
allows to adjust the behaviour of the mouse as well as the sensitivity of the mouse. The mouse
options dialog is shown in figure (6.35).
-
Mouse double click
- The slider can be used to adjust the double click speed. Fast means
that the time between two clicks is very short, slow means that the time between two
mouse clicks can be quite long.
-
Reverse mouse buttons
- the behaviour of the left and right mouse buttons can be changed
by by checking the checkbox; this is especially useful for left-handed people.
-
Ctrl+Right mouse button
- Assigns an action to a right mouse button click while holding
the CTRL key pressed.
-
Ctrl+Left mouse button
- Assigns an action to a left mouse button click while holding the
CTRL key pressed.
The following actions can be assigned to CTRL-right mouse button or ALT-right mouse
button:
-
Topic search
- The keyword at the mouse cursor is searched in the help index.
-
Go to cursor
- The program is executed until the line where the mouse cursor is located.
-
Breakpoint
- Set a breakpoint at the mouse cursor position.
-
Evaluate
- Evaluate the value of the variable at the mouse cursor.
-
Add watch
- Add the variable at the mouse cursor to the watch list.
-
Browse symbol
- The symbol at the mouse cursor is displayed in the browser.
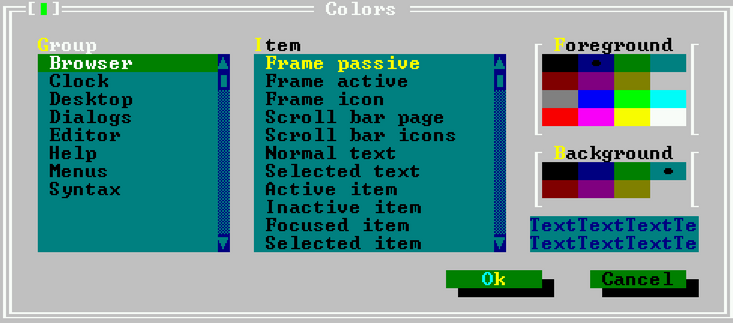
Almost all elements of the IDE such as borders input fields, buttons and so on can have
their color set in this dialog. The dialog sets the colors for all elements at once, i.e. it is not so that
the color of one particular button can be set.
The syntax highlighting colors for the editor windows of the IDE can also be set in this dialog. The
colors dialog is shown in figure (6.36).
The following elements are visible in the color dialog:
-
Group
- Here the group to be customized is displayed; A group is a specific window or series of
windows in the editor. A special group is Syntax which sets the colors for syntax
highlighting.
-
Browser
- Sets the colors for the symbol browser window.
-
Clock
- Sets the colors for the clock in the menu.
-
Desktop
- Sets the colors for the desktop.
-
Dialogs
- Sets the colors for the dialog windows.
-
Editor
- Sets the colors for the editor windows.
-
Help
- Sets the colors for the help windows.
-
Menus
- Sets the colors used in the menus.
-
Syntax
- Sets the colors used when performing syntax highlighting in the editor
windows.
-
item
- Here the item for the current group can be selected. The foreground and background of this
item can be set using the color selectors on the right of the dialog.
-
Foreground
- Sets the foreground color of the selected item.
-
background
- Sets the background color of the selected item.
-
Sample text
- This shows the colors of the selected item in a sample text.
Setting a good color scheme is important especially for syntax highlighting; a good syntax
highlighting scheme helps in eliminating errors when typing, without needing to compile the
sources.