Objectives: |
|
Background: |
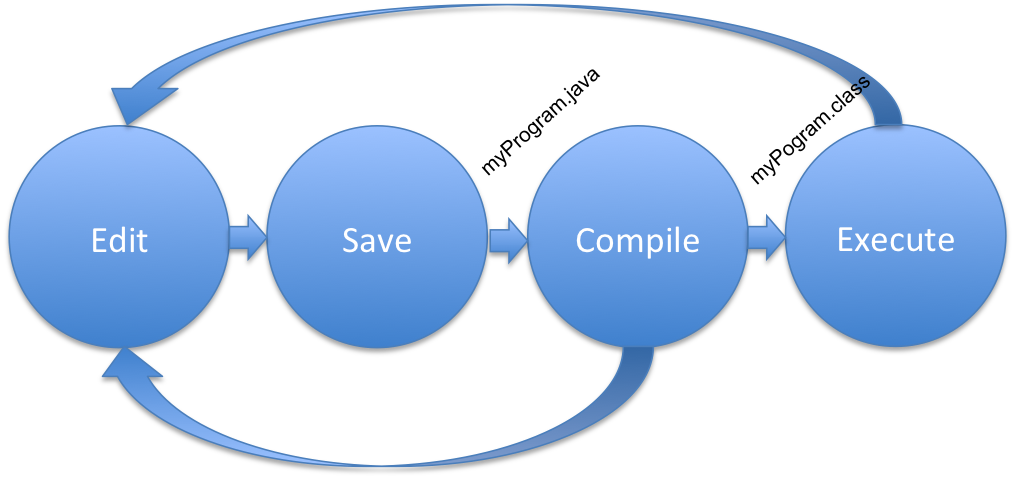
This is the first programming lab in Java. You will experiment with different kinds of compiler errors and will learn to recognize when an error occurs, what information is conveyed in the error message, where the error occurred, and how to resolve it. This lab also emphasizes the development cycle of edit, save, compile, and run. |
New Terms: |
|
Materials Needed: |
|
Submission: |
Upload these items via the Canvas Lab 03A assignment link:
|
Part 1: Setting up your environment
- Create a folder for this lab. If this is the first time you've set up your network space, create a CS139 folder to store work for this class and then build a folder for the lab. (No spaces in the directory name).
- Download the worksheet to your lab directory.
- Navigate to the folder for this lab (remember the cd command?).
nano is a simple text editor that can be used on most Unix platforms. When nano is invoked, a control-key menu appears at the bottom of the screen. Creating a new Java file with nano by executing the following command:
nano Hello.java
Part 2: The edit→save→compile→run cycle
-
Type the following code into the file opened by nano. Pay attention to all spelling, punctuation, and indentation but disregard color coding.
NOTE: Java is case sensitive ("System" is different than "system"). Using the wrong case anywhere will cause an error.
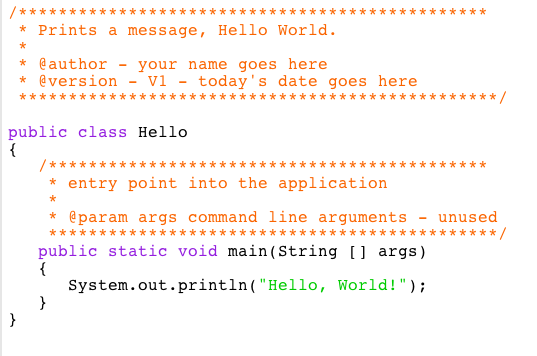
- Make sure you change the names and the date to your names
and the current date.
- Save the file into the folder that you are using for
this lab and then exit Nano.
- Using the terminal, compile your Java program with the following command:
- Correct any compilation errors being careful to save and then recompile after each change. If the program compiles correctly there will be no message.
-
Execute the ls command. (Question 0) What other file do you see in the directory?
-
Execute your Java program using the following command in the terminal:
java Hello - If your program is executed successfully, without any error, Hello, World! will be printed on your screen in the terminal.
javac Hello.java
You have just completed the edit→save→compile→execute cycle.
Each time you change and save your program, you will need to
recompile the source file to see the changes reflected in the
executed program.
Part 3: Syntax Errors
This part of the lab will give you some practice in reading
and interpreting syntax errors. Recall that syntax errors are
errors in the form of the statements. As you make each error,
pay particular attention to the error message produced, and in
some cases, a single error will cascade several other errors.
Return to nano to do this and the following portion of
the lab.
Record the answers to the following questions in your
worksheet, to be handed in at the end of the lab.
- Class name different from file name. Delete the
beginning ‘H’ from the name of the
class (so the first non-comment line is public
class ello) and save the program.
(Question 1) What happens when you try to save it?
Now compile your program. Keep the public class ello statement in the code.
(Question 2) What error message do you get during the compile?
- Interpreting the error message. All
compiler messages will begin with the name of the source
file (Hello.java) and the line
number in that file that contains the error. This will be
followed by the text describing the error condition.
(Question 3) What line number was your error on?
- Misspelling inside string. Correct the
mistake above, and save, and recompile. Next, delete one letter
'l' from the Hello
in the message to be printed (inside the quotation marks).
Save the program and recompile it. There is no error message
--
(Question 4) Why is there no error message?
Now run the program, and review the "new terms" at the top of this lab.
(Question 5) What type of error just occurred?
- No ending quotation mark in a string literal.
Correct the spelling in the string, then delete the ending
quotation mark enclosing the string Hello,
World! Save the program and recompile it.
(Question 6) What error message(s) do you get?
- No beginning quotation mark in a string literal.
Put the ending quotation mark back, then take out the
beginning one. Save and recompile.
(Question 7) What was different about the errors this time?
- No semicolon after a statement. Put the missing quote back,
and remove the semicolon at the end of the line that prints the
message. Save the program and recompile it.
(Question 8) What error message(s) do you get?
Part 4: Declaration and assignment statements
We have seen declarations in our Scratch work as building a variable. Now we will build our variable using the Java language. All variables must be declared prior to their first use in the program. A declaration is an abstract data type followed by an identifier followed by a semi-colon. For example, int sum; declares the variable sum to be an int (short for integer). Add the following line to the program prior to the System.out.println statement.
String message;
This statement declares message to be a variable container that can hold Strings. Note that String must be capitalized. Skip one line (make one line of white space) and add an assignment statement. This statement will put the String literal “Hello, World” into the container called message. By now, you are probably getting a little tired of "Hello, World", so feel free to substitute your favorite quotation or song lyric. (Can you find an interesting computer themed quotation?)
message = “Hello, World”;
Finally, make this change to print the contents of the message:
System.out.println("Hello, World!");
→
System.out.println(message);
Save and
recompile your program. Then run it to make sure that the
message prints in the way that you want it to.Part 5: Manipulating output
System.out.println() sends a string to standard output and adds a
new line character at the end of the line. What happens if
we use System.out.print()? This
section will let you manipulate the output.- In your program, declare a second String variable
named message2. Our Style Guide conventions
require both declarations to appear at the top of the main method. Assign to it the following String value "I'm
happy to be a programmer."
- Change your println
to a print command: System.out.print(...); Then add
another print command: System.out.println(message2).
Compile and run your program.
(Question 9) How many lines of output do you get?
- After the word, "world", in message ( or after the last word in the message that you created ),
put in the symbol "\n". This
is one of the "escape" characters in Java. Recompile and run
your program.
(Question 10) How many lines of output do you get?
- The "\n" is the newline
character and can be used to force a new line wherever we
want it. In this case, it is doing the job that the println did before, adding a new line
after the last character prints.
- Finally, remove the second println
command which is printing the second line of the message.
Change the other print command to read: System.out.println(message + message2);
- Recompile and run the program.
(Question 11) What output do you get?
- The "+" symbol is our first operator. Applied to Strings, it performs a concatenation of those two Strings. We will see in later labs that this is also the operator that we use to add two numbers together.
Part 6: Submit your work
- Upload two files: Hello.java and your completed worksheet. Please do not upload your .class file.