
|
The Java
Programming
Language
|
 |
| Objectives: |
- Use JGrasp to edit a java source file
- Compile a java source file
- Recognize when there are syntax errors in a java file
- Correct syntax errors in a java source file
- Run a java program using JGrasp
|
| Background: |
This is the first programming lab in Java. The student will
experiment with different kinds of compiler errors and will learn to
recognize when an error occurs, what information is conveyed in the
error message, where the error occurred and how to resolve it. This lab
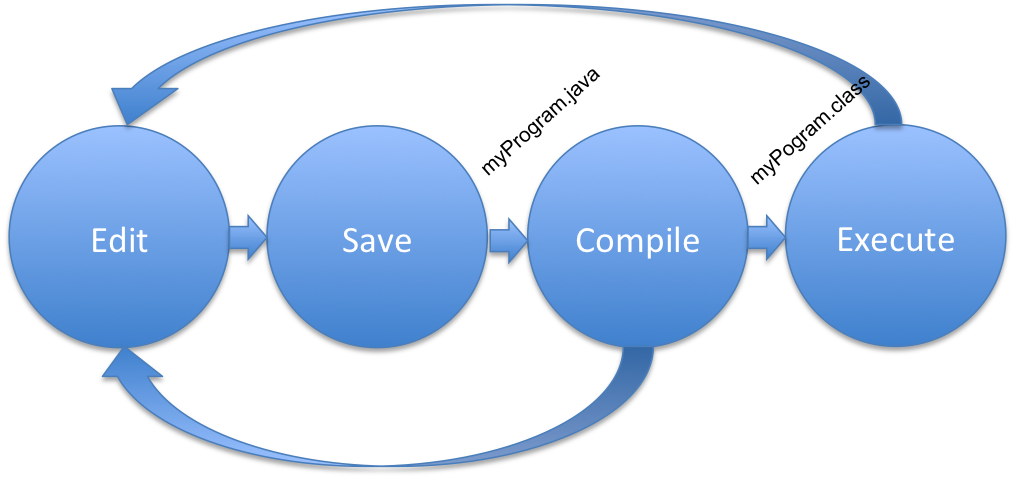
also emphasizes the cycle of edit, save, compile then run. |
| New Terms: |
- java source file
- The program as written
by the programmer. It is in "English-like" java code.
- java class (byte code) file
- The program as produced
by the compiler. Byte code is a language common to all
implementations of java and is translated to produce the executable
code for a given machine.
- compiling
- The process of checking
the syntax of a program and producing the byte code file if the syntax
is correct. (Note: other compilers produce executable code.
- syntax error
- An error in the source
code which is a violation of the rules of the language (syntax).
- logic error
- An error which causes
the program to produce the wrong result.
- Java Virtual
Machine
- The program that reads
the byte code and interprets the code (executes the code)
- execute
- The process of running a
program on the computer.
|
| Materials: |
JGrasp editor with Java 1.6 compiler or higher.
worksheet.txt
|
| Prerequisites: |
Students are familiar with the lab environment. |
| Acknowledgement:: |
Original lab by Nancy Harris |
Turning in
your work: |
Upload the completed worksheet and program (.java files) to
the Blackboard assignment for this lab. |
Part A:
Setting up your environment
- Log into the computer using the normal student login.
- Mount your n-drive onto the local machine. (See last
Tuesday’s lab if you have forgotten how).
- Create a directory in the n-drive for this lab (suggested name
09-03.
- Open JGrasp.
Part B:
The
edit→save→compile→run cycle
JGrasp is a text editor much like Notepad and
Wordpad. But it will also do more. First, it highlights in
color reserved words as you type them. It also supports indenting
of sections of the code. When you want to compile your code,
there is a tool within JGrasp to do so. And when you want to
execute your program, it will do that too. For this class, if you
prefer to use another editor, you may. What matters most is the
end result code and not what tool you used to build it.
- Create a new java file. File/New/Java
- Type the following code into the editor window. Pay attention to
all punctuation and indentation. (Indentation is one tab stop in JGrasp
or 3 spaces.) NOTE: YOU MAY NOT CUT AND PASTE THIS IN...YOU MUST TYPE
IT IN AS IS. We are computer scientists and computer scientists
learn through their fingertips. (Later on you will be able to
take such shortcuts.)
/***********************************************
 * Prints a message, Hello World.
 *
 * @author - your name goes here
 * @version - V1 - today's date goes here
 ************************************************/

public class Hello
{
   /********************************************
    * entry point into the application
    *
    * @param args command line arguments - unused
    *********************************************/
   public static void main(String [] args)
   {
      System.out.println("Hello, World!");
   }
}
|
- Make sure you change the name and the date to your name and the
current date.
- Save the file into the n-drive folder that you
just created for this lab and save it with the file name of Hello.java. NOTE: Java is case sensitive,
meaning, a name like System is different than
a name like system. You must save the
file with the same name as the class name (in the line public class Hello).
- Compile your Java program (see the green + sign icon
at the top
of the page).
- If it compiles successfully you will get a message: ----jGRASP: operation complete and no other
message. If you have additional messages, check your typing very
carefully. Your error message will give you the line number of the
first place the compiler was "confused" by what you typed.
- Upon successful compilation, navigate to the directory (use
file browser) in which you
placed your Hello.java file and you
should see a Hello.class file.
- Execute your Java program from JGrasp. (See the red running
man icon at the top of the page.)
- In the Run I/O tab, you should see the message, "Hello,
World!"
appear. If not, please see the instructor before proceeding.
This is the edit→save→compile→execute cycle. If you
have
compiler errors, you need to go from compile back to edit and save.
Each time
you correct an error and save your program, you will need to recompile
the
source file to see the changes reflected in the executed program.
Part C: Running java from the terminal window
You can run the Java compiler and the Java virtual machine from
the
terminal window. Open a terminal window on your local machine
(use either the Accessories menu or CTRL/ALT/F1.
Navigate to the folder containing your Java program using the cd command.
Delete the .class file from your prior run
(you can do this from the window view or in the terminal view using the
rm command).
To compile the file, type javac sourcefilename and press
enter (where sourcefilename is the name of your program, Hello.java).
If you get no error messages, the program has compiled
successfully. Type the list command to display the contents of
your folder. You should see the .class file again.
To run the application, type java classfilename. DO NOT
type the
.class. Instead, just give it the name
of the class as you see it
inside of your program. Press enter and you will see the message
displayed.
Part D: Submitting your work
We use several different mechanisms for submitting lab and
project
work. The first is to upload the files to a Blackboard
assignment. You found the link to this lab inside of a Blackboard
assignment. In the Assignment
Materials section, click on the link to attach a file (Browse).
Navigate to the n-drive folder for this lab and upload the
.java file. Do not upload your .class file. When you have
the file attached, click on the Save link.
This will save your program to this Blackboard assignment, but it
does not make it available to the instructor. We will do that on
a later step.
In future labs, we will review other ways of submitting your work.
Part 4 Syntax Errors
This part of the lab will give you some practice in reading and
interpreting syntax errors. Recall that syntax errors are errors in the
form
of the statements. As you make each error, pay particular attention to
the
error message produced, and in some cases, a single error will cascade
several other errors. Return to JGrasp to do this and the
following portion of the lab.
A general practice to follow is that if you have multiple errors,
focus on
the first error, correct it, then recompile. Do not try to figure out
all of
the errors at once.
- Class name different from file name. Delete the beginning ‘H’ from the name of the class (so the
first non-comment line is public class ello)
and save the program. (Question 1)What happens
when you tried to save it?
- Class name different from file name. Go ahead
and save your file anyway as Hello.java.
Compile your program. Keep the public class ello
statement in the code. (Question 2) What error
message do you get during the compile?
- Interpreting the error message. All compiler
messages will begin with the name of the source file (Hello.java)
and the line number in that file that contains the error. This will be
followed by the text describing the error condition, and will be
followed by the statement with an up carat (^)
to show where the error was found. (Question 3)
Under what character is the up carat found?
- Misspelling inside string. Correct the mistake
above, and save, and recompile. Next, delete one l
from the Hello in the message to be printed
(inside the quotation marks). Save the program and recompile it. There
is no error message—(Question 4) Why is there no error message?
Now run the program. (Question 5) Is this
output correct using normal English spelling? This is an example
of a logic error, an error
that produces an incorrect result.
- No ending quotation mark in a string literal.
Correct the spelling in the string, then delete the ending quotation
mark enclosing the string Hello, World!. Save
the program and recompile it. (Question 6) What
error message(s) do you get?
- No beginning quotation mark in a string literal.
Put the ending quotation mark back, then take out the beginning one.
Save and recompile. (Question 7) How many
errors this time?
- When you get multiple errors always concentrate on finding the
first one listed!! Often fixing that one may fix others. Correct the
error and recompile.
- No semicolon after a statement. Now remove the
semicolon at the end of the line that prints the message. Save the
program and recompile it. (Question 8) What
error message(s) do you get?
Part 5: Declaration and assignment statements.
We have seen declarations in our prior algorithms as building a
container.
Now we will build our container using the Java language. All containers
must
be declared prior to their first use in the program. A declaration is a
abstract data type followed by an identifier followed by a semi-colon.
For
example, int sum; declares the variable sum to be an int (short
for
integer). Add the following line to the program prior to the System.out.println statement.
String message;
This statement declares message to be a
variable
container that can hold Strings.
Note that String must be capitalized. Skip
one line (make one line
of white space) and add an assignment statement. This statement will
put the
String literal “Hello,
World” into the container called message.
message = “Hello, World”;
You may use a different string if you prefer for your message. Finally,
change: System.out.println ("Hello, World!");
To:
System.out.println(message); This change will
print
the contents of message. Save and recompile your program. Then run it
to make
sure that the message prints in the way that you want it to.
Part 6: Manipulating output.
System.out.println sends a string to standard output and adds a new
line
character at the end of the line. What happens if we use
System.out.print? This section will let
you manipulate the output.
- In your program, add in a second String variable declaration
for message2.
Assign it the String value "I'm happy to be a
programmer."
- Change your println to a print command (System.out.print(...);
Then add another print command:
System.out.println(message2).
Compile and run your program.
- (Question 9) How many lines of output do
you get?
- After the word, "world!", in message,
put in the symbol "\n". This is one of
the "escape characters". Recompile and run your program. (Question 10) How many lines of output do you get?
- The \n is the newline character and
can be used to force a new
line wherever we want it. In this case, it is doing the job that
the println did before, adding a new line
after the last character
prints.
- Finally, remove the second println
command which is printing the
second line of the message. Change the other print command to
read: System.out.println(message + message2);
- Recompile and run the program. (Question
11) What output do you get?
- The "+" symbol is our first operator.
Applied to Strings,
it performs a concatenation of those two Strings. We will see in
later labs that this is also the operator that we use to add two
numbers together.
Part 7: Submitting your worksheet.
- Return to the Blackboard assignment.
- View/complete the assignment and Browse for your worksheet file.
Attach it to the assignment.
- Click on the Submit button to submit
this work for grading. This action makes it available to the
instructor and lets he/she know that it needs to be evaluated.

|
last
updated - 09.03/2009 by NLH |
 |