CAPWIC 14 - Lab Sampler - Java Applets
What is an Applet?
In this lab, you will create an Applet. An Applet is a java program that is
designed to be run from some other application. In this lab, the applet will
be run from a web browser. Your will "paint" a picture. You will also create
a web page to run the applet.
You will start with some code, experimenting to see what various statement
do and making some alterations. Note that in this applet (unlike regular java
programs), the "main" method is actually named paint (and takes in a single Graphics parameter). The
Graphics object is our "rendering" object.
Refer to the Java APIs for further information about any of the classes that you see here.
Part 1 - Creating the Applet
- Begin by downloading the program which you will find here(Right click, save as). Note the import statements that
reference the JApplet class and the java.awt package (the java.awt package contains many classes useful in
creating graphical applications). The Picture
class you are writing "extends" the JApplet class. "Extends" means that a Picture object is also a type of JApplet object (like a Ford is a type of car) and
will inherit the properties (methods and attributes) of the JApplet class.
- Some of the lines in Picture.java are "live"
and some have been commented out (block comments begin with /* and end with */).
- Open up the JGrasp editor and compile the program as you downloaded
it (do not uncomment any lines yet). The compile button looks like a big green plus sign (+).
- Test your program by clicking on the red running guy next to the compile button.
- Now change the background color to something else. Notice the parameter
of the setBackground method. Java has a Color
class object. It has a number of Color
constants which you can use or you may build your own. To build your own
color, construct a Color object, using
values for red, green, and blue. A color reference is found at the site
HTML safe colors
, or play with different values of R, G, and B.
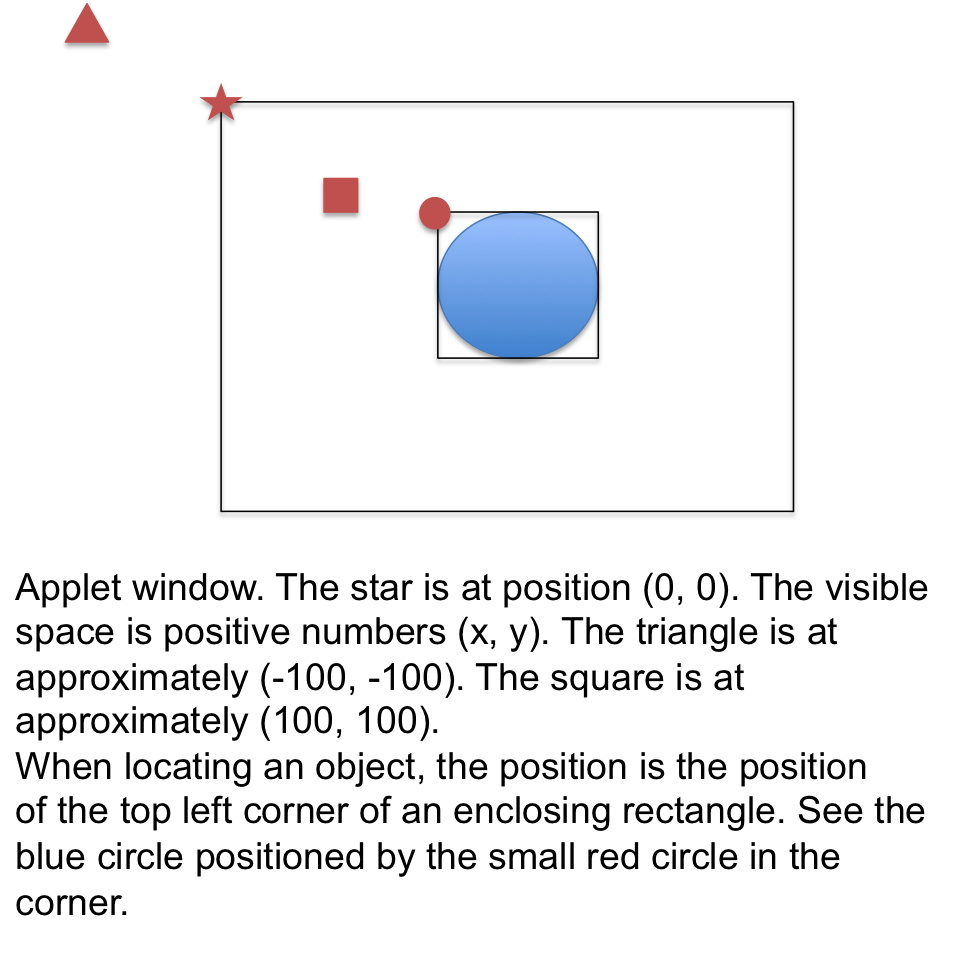
- Each of the commented blocks adds an element to the picture. Remove the commenting one at a time to see the different shapes and how they are positioned. See the diagram below about positioning. The yellow circle is positioned partially off screen. The rest of the elements are positioned on screen. Notice that to make different colors, you need to change the color, then render the object.
Part 2 - Making your own picture
See the lab sheet for a list of some of the different graphics elements you can add. Notice that they all work like the ones that you have seen thus far. Draw methods outline the shape in the specified color, fill methods create solid shapes.
Get creative and create a picture of your own liking. We have used Snowmen in the past, but I think we are all pretty sick of snow, so flowers or bright abstract art might be in order.
Part 2 - Deploying the Applet
- Download an HTML file from here.
HTML is a formatting language. It contains text to print as well as
instructions for formatting the text. In addition, the HTML instructions
can also call programs such as this Applet.
The HTML instructions are called tags. The tags provide formatting
instructions in HTML. All tags are surrounded by < and >
delimiters. The <html> tag begins an HTML
file and the closing counterpart </html>
ends the file. Most tags are in begin/end pairs. The beginning tag will
contain the tag name and the ending tag will have a / before the end
name. The tags that you see in this file and their uses are described
here:
- <head>: Defines the "heading" section of an html page. The
<title> tag goes in the heading section.
- <title>: Defines the title on the title bar of the web
page.
- <body>: Defines the body section of the web page. This is
what will display on the page.
- <h3>: Defines a level 3 heading (there are tags for defining
headings from levels 1 to 6, guess what the other five tags are).
- <applet>: Displays an applet to be inserted into the web
page. The attribute of name contains the name of the corresponding
file and the height and width attributes define the size of the
resulting window.
- <table>, <tr>, <td>: These tags define a table.
In this case, we are putting the applet in a table with one row and
one column just as a mechanism for getting the applet centerd and
displayed with a border printed around it.
- You need to alter the applet tag to use your class file instead of
SnowmanDemo.class. Make that change and save.
- Test your html page by opening the page in a web browser (Firefox is preferred) (File/Open
File).
Updated 03/13/2014