Instructions: Answer the following questions one at a time. After answering each question, check your answer (by clicking on the check-mark icon if it is available) before proceeding to the next question.
Getting Ready: Before going any further, you should:
downloads directory/folder). In most browsers/OSs, the
easiest way to do this is by right-clicking/control-clicking on
each of the links above and then selecting CashMachine. What happened?

CashMachine.
PINPadWindow class.
setDefaultCloseOperation(JFrame.EXIT_ON_CLOSE);
CashMachine and again click on the icon that
closes the window (which will vary with the
operating system you are using). What happened now?
Container in a table/matrix
that contains four rows and three columns. What layout manager would
you use?
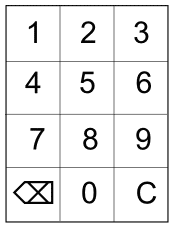
setupLayout() method in the
NumberPad class. Your implementation must contain
12 JButton objects and be consistent with the
following wireframe.
setupLayout() method in the
PINPadWindow
class so that it now constructs
a NumberPad and adds it to the content pane.
What code is in the setupLayout() method now?
CashMachine. How big is the window and how
big are the buttons?
CashMachine.
Font object, and call the setFont()
method on each JButton (passing it the Font
you created).
PINPadWindow class.
pack();
Execute CashMachine. How big is the window now?
PINPadWindow class.
setResizable(false);
Execute CashMachine. Can you re-size the window?
Display class that specializes the
JLabel class. The default constructor must call the
single-parameter constuctor in the parent class passing it
" " and then call the setBorder()
method passing it an etched border
(see BorderFactory
 for help in creating
a border).
for help in creating
a border).
What code is in the class?
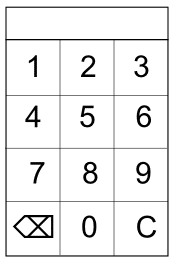
setupLayout() method in the
PINPadWindow class so that it adds
a Display above the NumberPad
in a fashion that is consistent with the
following wireframe.
What code is in this method now? (Note: Remember to
construct an appropriate layout manager and pass it to
setLayout().)
Display class so that it now realizes the
ActionListener
interface.
Specifically, it should respond to ActionEvent objects
that have an action command of "C" by clearing its
contents (i.e., by setting its text to " ")
and any other ActionEvent objects by appending
the action command to its current contents.
What code is in this class now?
NumberPad class
so that it is now passed
an ActionListener object
that it stores in a private attribute named listener,
before calling
setupLayout(). (Obviously, you;ll also need to add
the attribute). What code is in the constructor now?
addButton() method in the NumberPad
class so that it makes listener an ActionListener
on the button it is adding.
What code did you add?
setupLayout() method in the
PINPadWindow class so that the Display
is now an ActionListener on the NumberPad.
What code did you change?
CashMachine. What happens when you click
on the various buttons?
Display class so that the text is
aligned to the right. What change did you make?
Display so that:
Display is empty it displays the
text "Enter your PIN".Display is not empty it shows
(an appropriate number of) asterisks rather than the PIN.
Display class now?
Display so that the text is gray when
"Enter your PIN" is displayed and red when the asterisks are displayed.
What code did you change?
KeyListener
interface. The other is to use key bindings. This section of the lab
will help you understand how to use the latter.
Action
interface.
What is the purpose of this interface?
ActionListener that will be associated with a
particular key (really the String on that key) and
will programmatically "click" the
corresponding JButton (e.g., that will cause
the 1 key to click the 1 button. Create
a class named ClickAction that
extends AbstractAction with a constructor that is
passed a JButton and stores it in an approrpiate
attribute. What code did you add?
actionPerformed() method that has the
button grab the focus and click itself (staying pressed for
50 milliseconds). What code did you add?
ClickAction to the NumberPad
object's ActionMap
for each JButton. To do this you need to modify the
NumebrPad object's addButton() method.
Specifically, you need to get the
NumberPad object's ActionMap, construct
a ClickAction for the JButton and put it
in the map. What code did you add to the addButton() method?
InputMap
for the NumberPad that maps each key stroke of interest to
the text on the corresponding button (e.g., maps
KeyStroke.getKeyStroke(KeyEvent.VK_0, 0)
to "0"). What code did you add to the constructor
in the NumberPad class?
Copyright 2023