Matrix and Vector classes/templates
from programming assignment 5 in a 2-D rasterizer
(and supporting classes). Specifically, you must write a
Geometry template and a Rasterizer2D class.
This assignment is about 2-D computer graphics. It does not use any new topics from our study of C++.
The first is a simple struct that encapsulates RGB colors.
It should be self-explanatory.
The second is a simple (and not robust) interface for a frame
buffer. It uses traditional Euclidean coordinates with the origin
of the coordinate system in the middle of the
FrameBuffer. Most importantly, it provides the
ability to set the color of individual pixels using
the setPixel() method and the ability to "display"
the entire image (after it has been completed) using the
show() method.
The last two are concrete classes that implement the
FrameBuffer interface. One of them writes
a .ppm (file named cs488.ppm) when its
show() method is called. This file should be readable
by any bitmap image viewer. The other uses SDL to display
a window containing the image when its show() method
is called. You can use either or both for testing.
Because of slight differences between the way SDL works under
different OSs, there are some lines that may need to be
commented-out/included for different OSs. This should be apparent
from the source code. Also, depending on your environment you may
need to change the #include for SDL. Hopefully, you
will not need to make major changes to this class, but you should
feel free to make changes if necessary.
Though SDL has a complete 2-D graphics library, you must not use it. We are using SDL exclusively as a simple (platform independent) windowing system.
Be careful about the dimensionality of the functions in the
Geometry template. Even though this assignment is about
2-D rasterization, some of the functions in this template are
N-dimensional. Also, note that you may not need to use all of the methods
in the Geometry template in your Rasterizer2D.
Determining which you need and which you don't should help you
assess your understanding of the material.
Matrix and
Vector templates. However, so that you don't
accidentally break them, and to make it easier to submit,
you should copy them into the directory/folder for this assignment.
Geometry template could have been designed in a variety
of different ways. You might want to think about the following questions:
Matrix objects could, instead, have been
Vector objects? Should they have been?area(), inside(), and
toImplict() are templated so that they are
one-to-one with Matrix. What would happen if they
weren't? GIven that they are, how must they be invoked?inside() is passed three "vectors"
(i.e., Matrix<2,1> objects) containing the
vertices rather than a single Matrix. Would
it be better to pass a Matrix?Geometry template (i.e., methods that don't
use a FrameBuffer object). Note that
several functions in Geometry.hpp are templated
(for consistency) when they needn't be (i.e., they only work
in 2D) . For example,
this is true of the intersect() function.
When you invoke these functions you must
bind N to 2. For example:
      double alpha, beta;
      Vector<2> p, r, q, s;

      p = {0.0,4.0};
      q = {4.0,8.0};
      r = {0.0,6.0};
      s = {3.0,3.0};
      intersect<2>(p, q, r, s, &alpha, &beta);
You should also create "visual" unit tests for the
Rasterizer2D (i.e., methods that use the
FrameBuffer class). While one
could create an alternative headless (i.e.,
off-screen) FrameBuffer class for automated testing,
that is beyond the scope of this course. At a minimum, you should
test:
The output from this test must look like the following:
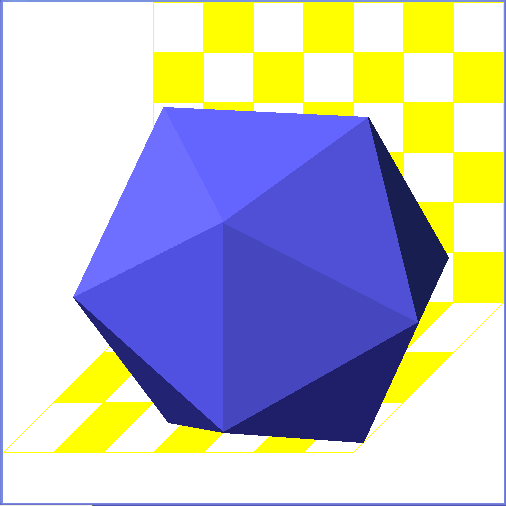
Note that, while this image looks 3-D, it does not involve any 3D rasterization techniques.
pa6.zip that contains
just Vector.hpp, Matrix.hpp,
Geometry.hpp, Rasterizer2D.h,
and Rasterizer2D.cpp (all in the top-level directory)
using Autolab.
In addition, you must submit a .pdf file that
contains the image generated by your code when you run
PA6IntegrationTest
using Canvas.
Copyright 2020